Feedburner Facebook youtube pinterest twitter

Thursday, October 9, 2014

Increase/Decrease MTK6572 Cache

This is going to be somewhat like this previous post, increasing internal storage on the MTK6572, with the exception of increasing, or decreasing, the cache, you can decide which is better.

Somebody asked me about a mod I tried on my tablet where the Cache size was decreased, giving a total of 2.95gb of internal storage.  Seeing the internal storage at almost 3gb was pretty cool, although, it seemed as if the performance of the tablet decreased somewhat.  After trying the mod again, noticed that some apps slowed down and others would not open.  This reminded me of something learned in a college course, the instructor had said something about, the more space you have will give you better speed.  Another words, if you install an 80gb hard drive with a RPM of 5400 and 4gb of RAM in your computer.  Now if one were to upgrade that hard drive, without changing anything else, to 100gb with a RPM of 7200, you will notice the difference in speed. This made a little light click, thinking, well if there is more cache for apps, would the tablet run faster, in my opinion it does appear to run a little better then before.

What I noticed yesterday is that when playing with the numbers, in order to get a working number to enter in the EBR1, everything has to be in 16 bytes, so that the numbers, for the Internal Application Storage, are divisible by 32.  A couple of of the caches sizes I did looked at are 126 MiB and 376 MiB.  Not sure if there are any other sizes when it comes to the MTK6572, did successfully make a workable EBR1 work with a cache size of 512 MiB.

--- EBR1
Regular file, size 1 KiB (1024 bytes)
DOS/MBR partition map
Partition 1: 376 MiB (394264576 bytes, 770048 sectors from 1443328)
  Type 0x83 (Linux)
Partition 2: 512 MiB (536870912 bytes, 1048576 sectors from 2213376)
  Type 0x83 (Linux)
Partition 3: 1.998 TiB (2197353135616 bytes, 4291705343 sectors from 3261952)
  Type 0x83 (Linux)


This means, 394264576 bytes / 376 MiB = 770048 decimal value, BC000 hexadecimal value.


BC000 will then be converted to C00B:

00 00 83 00 00 00 00 06 16 00 00 C0 0B 00 00 00 
00 00 83 00 00 00 00 C6 21 00 00 00 10 00 00 00 
00 00 83 00 00 00 00 C6 31 00 FF 39 CE FF 00 00 
00 00 00 00 00 00 00 00 00 00 00 00 00 00 55 AA

Where does the extra bytes come from?  Well, if you do another math solution, it actually works out a little better when modding.  Lets take a number that is divisible by 2, how about 376 MiB, and see what the hex value is.


It's 3F, using some imagination, you have to fill in the blanks zeros, x3xF is read from right to left, entered from left to right as F0 03 now here is a EBR1 from the THL TS MTK6572:

00 00 83 00 00 00 00 56 11 00 00 F0 03 00 00 00 
00 00 83 00 00 00 00 46 15 00 00 E0 1C 00 00 00 
00 00 83 00 00 00 00 26 32 00 FF D9 CD FF 00 00 
00 00 00 00 00 00 00 00 00 00 00 00 00 00 55 AA

When you check the EBR1, disktype EBR1 

--- EBR1
Regular file, size 512 bytes
DOS/MBR partition map
Partition 1: 126 MiB (132120576 bytes, 258048 sectors from 1136128)
  Type 0x83 (Linux)
Partition 2: 924 MiB (968884224 bytes, 1892352 sectors from 1394176)
  Type 0x83 (Linux)
Partition 3: 1.998 TiB (2197340552704 bytes, 4291680767 sectors from 3286528)
  Type 0x83 (Linux)


Quite slick of them wouldn't you say?  This makes it so much easier, if somebody doesn't want to increase the cache by to much or decrease it to small, you just need a number that can be divided by 2.  Lets play around with a random number, if the cache is 126, lets just double it, giving a value of 256.


Looking at the hexadecimal value, yes it shows 80, so one has to use their brain power.  The hex total needs to be read from right to left, mentally add the 2 missing zeros from right to left then entering the hex value into the EBR1 from left to right.  So the Hex value is read x8x0 then entered as 00 08.

This is how it would looked after the change has been made:

00 00 83 00 00 00 00 56 11 00 00 00 08 00 00 00 
00 00 83 00 00 00 00 46 15 00 00 E0 1C 00 00 00 
00 00 83 00 00 00 00 26 32 00 FF D9 CD FF 00 00 
00 00 00 00 00 00 00 00 00 00 00 00 00 00 55 AA 

This is where all those mysterious bytes come from, disktype EBR1 now shows:

--- EBR1
Regular file, size 512 bytes
DOS/MBR partition map
Partition 1: 256 MiB (268435456 bytes, 524288 sectors from 1136128)
  Type 0x83 (Linux)
Partition 2: 924 MiB (968884224 bytes, 1892352 sectors from 1394176)
  Type 0x83 (Linux)
Partition 3: 1.998 TiB (2197340552704 bytes, 4291680767 sectors from 3286528)
  Type 0x83 (Linux)

Maybe a simple way of explainging would be, to obtain the correct numbers would be, if you are unsure of exactly what was increased/decreased, take the byte value from the original EBR1, subtract the byte value from the new byte value of the modified EBR1:

New EBR1: 
Partition 1: 256 MiB (268435456 bytes, 524288 sectors from 1136128)
  Type 0x83 (Linux)

Original EBR1:
Partition 1: 376 MiB (394264576 bytes, 770048 sectors from 1443328)
  Type 0x83 (Linux)


394264576-268435456=125829120 should be added as USERDATA+FAT+125829120 if decreasing your cache.
394264576-268435456=125829120 should be subtract as USERDATA+FAT-125829120 if increasing your cache

Just like the MTK6572 repartition mod for internal storage, the same rule applies, partition #2 start address needs to be one number higher then partition #1 end address.

gdisk EBR1

Number  Start (sector)    End (sector)  Size       Code  Name
   1         1136128         1660415   256.0 MiB   8300  Linux filesystem
   2         1394176         3286527   924.0 MiB   8300  Linux filesystem
   3         3286528      4294967294   2.0 TiB     8300  Linux filesystem


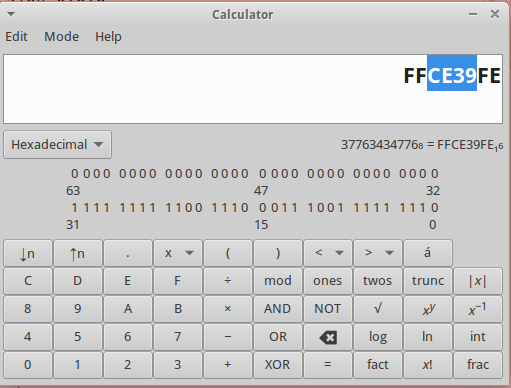
To fix the second two hex numbers in the EBR1, this means that the end sector of partition #1, 1660415 needs to be 1660416 for the start sector of partition #2.  In calculator enter 1660415 as a decimal value and you will get this:


Also, same rule applies, ignore the last two zeros and reading from right to left enter 1956 as 56 19 in your EBR1 like this:

00 00 83 00 00 00 00 56 11 00 00 00 08 00 00 00 
00 00 83 00 00 00 00 56 19 00 00 E0 1C 00 00 00 
00 00 83 00 00 00 00 26 32 00 FF D9 CD FF 00 00 
00 00 00 00 00 00 00 00 00 00 00 00 00 00 55 AA


Now check to make sure everything lines up, gdisk EBR1

Number  Start (sector)    End (sector)  Size       Code  Name
   1         1136128         1660415   256.0 MiB   8300  Linux filesystem
   2         1660416         3552767   924.0 MiB   8300  Linux filesystem
   3         3286528      4294967294   2.0 TiB     8300  Linux filesystem


Next make sure to update your scatter file, in terminal again enter disktype EBR1:

Regular file, size 512 bytes
DOS/MBR partition map
Partition 1: 256 MiB (268435456 bytes, 524288 sectors from 1136128)
  Type 0x83 (Linux)
Partition 2: 924 MiB (968884224 bytes, 1892352 sectors from 1660416)
  Type 0x83 (Linux)
Partition 3: 1.998 TiB (2197340552704 bytes, 4291680767 sectors from 3286528)

  Type 0x83 (Linux)

Enter 268435456 into the calculator to get the scatter hex value:

Change:

- partition_index: SYS16
  partition_name: CACHE
  file_name: cache.img
  is_download: true
  type: YAFFS_IMG
  linear_start_addr: 0x3C140000
  physical_start_addr: 0x3BB40000
  partition_size: 0x17800000
  region: EMMC_USER
  storage: HW_STORAGE_EMMC
  boundary_check: true
  is_reserved: false
  operation_type: UPDATE
  reserve: 0x00


To:

- partition_index: SYS16
  partition_name: CACHE
  file_name: cache.img
  is_download: true
  type: YAFFS_IMG
  linear_start_addr: 0x3C140000
  physical_start_addr: 0x3BB40000
  partition_size: 0x10000000
  region: EMMC_USER
  storage: HW_STORAGE_EMMC
  boundary_check: true
  is_reserved: false
  operation_type: UPDATE
  reserve: 0x00


Unlike the mod to increase the internal application storage, you do not need to worry about partition #3 end sector, this mod will not change it.  If you want to move on to the next step, increasing internal application storage for MTK6572, just click the link and follow the directions according to the modified cache scatter text.

**WARNING** THIS MOD IS TRICKIER WHEN CHANGING THE CACHE PARTITION, THESE STEPS ARE IMPORTANT TO SUCCESSFULLY FLASH  IN SPFLASH TOOLS

Open spflash tools, select the format tab and you need to manually format the three following areas and enter, ONE BY ONE, the linear_start_addr and partition_size according to the modified scatter.

- partition_index: SYS15
  partition_name: ANDROID
  file_name: system.img
  is_download: true
  type: YAFFS_IMG
  linear_start_addr: 0x3D40000
  physical_start_addr: 0x3740000
  partition_size: 0x38400000
  region: EMMC_USER
  storage: HW_STORAGE_EMMC
  boundary_check: true
  is_reserved: false
  operation_type: UPDATE
  reserve: 0x00

- partition_index: SYS16
  partition_name: CACHE
  file_name: cache.img
  is_download: true
  type: YAFFS_IMG
  linear_start_addr: 0x3C140000
  physical_start_addr: 0x3BB40000
  partition_size: 0x17800000
  region: EMMC_USER
  storage: HW_STORAGE_EMMC
  boundary_check: true
  is_reserved: false
  operation_type: UPDATE
  reserve: 0x00

- partition_index: SYS17
  partition_name: USRDATA
  file_name: data.img
  is_download: true
  type: YAFFS_IMG
  linear_start_addr: 0x53940000
  physical_start_addr: 0x53340000
  partition_size: 0x3E800000
  region: EMMC_USER
  storage: HW_STORAGE_EMMC
  boundary_check: true
  is_reserved: false
  operation_type: UPDATE
  reserve: 0x00


Once that is done, make sure that you do not download the ANDROID USRDATA and CACHE, change them from true to false according to this line:

From

is_download: true

To:


is_download: false

After you have flashed, in clockwork mod recovery, restore ONLY the data and system.  Do not do anything with the cache, your backup is according to the old cache size and will cause a soft brick, leaving the device stuck at the boot logo.  You will need to create a new backup for future restores according to the cache size.

Monday, October 6, 2014

Update: Tutoial Re-partition the MTK6572

This is an update from my previous post, the first post works, this mod is a little simpler and when flashing the new EBR1 on the MTK6572, you will not have to do a system restore, it works almost perfectly.


Three things needed that will make this process quick and painless are:

  1. A hex calculator, in Ubuntu, one is actually already installed, this tutorial will also teach you how to use it if you do not already know how, can also use an online hex calculator, here is a link to one.  Google is also a good tool for doing mathematical functions using hexadecimal formulas, click here for an example.  
  2. A hex editing program, I prefer okteta in Ubuntu, it highlights the hex numbers, making it easier to view.
  3. Linux can use terminal shell, not sure about windows, tried cygwin myself, just did not seem to like the EBR1 files for the MTK6572.
First thing that needs to be done is, in your MTK6572_Android_scatter.txt, you need to add the partition_size of USRDATA and FAT:


- partition_index: SYS17
  partition_name: USRDATA
  file_name: userdata.img
  is_download: true
  type: NONE
  linear_start_addr: 0x43F40000
  physical_start_addr: 0x43940000
  partition_size: 0x20000000
  region: EMMC_USER
  storage: HW_STORAGE_EMMC
  boundary_check: true
  is_reserved: false
  operation_type: UPDATE
  reserve: 0x00

- partition_index: SYS18
  partition_name: FAT
  file_name: NONE
  is_download: false
  type: NONE
  linear_start_addr: 0x63F40000
  physical_start_addr: 0x63940000
  partition_size: 0x87040000
  region: EMMC_USER
  storage: HW_STORAGE_EMMC
  boundary_check: true
  is_reserved: false
  operation_type: INVISIBLE
  reserve: 0x00

Open up the calculator, and under mode, select programming, now make sure that you have Hexadecimal enabled in the calculator and enter the two values, as so, and press enter:


While you have that hexadecimal value available, lets update the scatter text partition_size with the total number, in the USRDATA section, enter the total hexadecimal value, than for FAT 0x0.  Found that leaving FAT as 0x0, even with the 110kb leftover internal storage forces that internal storage to become an unallocated space, this makes it easier to hide. 

Now change the dropdown from hexadecimal to decimal, and divide that decimal into 32 from, then press enter:


Again, change the decimal drop down box back to hexadecimal, and this is going to be the new hex value in in Partition #2 of your EBR1.  Note, in the calculator, the value is actually read from right to left but entered in the EBR1 from left to right, ignoring the 0000 at the end, as I highlighted in the calculator, the number 5382 will be entered as 82 53.


Here is an example of my EBR1 file for the Irulu 7inch MTK6572, I've highligted the first two numbers that are going to be changed:

00 00 83 00 00 00 00 06 16 00 00 C0 0B 00 00 00 
00 00 83 00 00 00 00 C6 21 00 00 00 10 00 00 00 
00 00 83 00 00 00 00 C6 31 00 FF 39 CE FF 00 00
00 00 00 00 00 00 00 00 00 00 00 00 00 00 55 AA

The 00 10 is now going to become 82 53.  It is usually a good idea to save your EBR1 under a new name, it will load in SPFLASH tools under any name that you call the EBR1, in this case, it has been named as 2.5gb-EBR1.

In terminal shell, lets check the value of 2.5gb-EBR1, or whatever you chose to name yours:

--- 2.6gb-EBR1
Regular file, size 1 KiB (1024 bytes)
DOS/MBR partition map
Partition 1: 376 MiB (394264576 bytes, 770048 sectors from 1443328)
  Type 0x83 (Linux)
Partition 2: 2.610 GiB (2802057216 bytes, 5472768 sectors from 2213376)
  Type 0x83 (Linux)
Partition 3: 1.998 TiB (2197353135616 bytes, 4291705343 sectors from 3261952)
  Type 0x83 (Linux)


As you can see, the number is exactly the value of my USRDATA+FAT, but....there is one little issue in using the entire value, all MTK6572 that this method has been tested on various devices  The full value will not load, I have tried all different methods, just cannot figure out how to get it to work, this may be because the mod does not actually change your blocksmap.  In terminal shell, if you type adb pull /etc/dumchar_info, before and after the mod, this is where MTKdroid tools pulls the blocks maps from, it will not be changed.  There has to be a leftover value, the smallest being 110kb, in the EBR1, in order for the mod to actually work. 

In the area where the old value was 00 10 but now is 82 53, for the first number, every one adds 110kb and for the second set of numbers, every one added is 32mb.  The 82 need to be reduced by one, leaving a value of 81, enabling the modified EBR1 to successfully load without issues.  If you want to try the full value yourself, don't be surprised when the tablet doesn't get past the boot logo.

Now in terminal, once you have reduced your first number by one, again type disktype 2.6gb-EBR1 and the value is now:

--- 2.6gb-EBR1
Regular file, size 1 KiB (1024 bytes)
DOS/MBR partition map
Partition 1: 376 MiB (394264576 bytes, 770048 sectors from 1443328)
  Type 0x83 (Linux)
Partition 2: 2.609 GiB (2801926144 bytes, 5472512 sectors from 2213376)
  Type 0x83 (Linux)
Partition 3: 1.998 TiB (2197353135616 bytes, 4291705343 sectors from 3261952)
  Type 0x83 (Linux)

If you want, you can subtract that number from the first number, no matter what the size of your total USRDATA+FAT, it will come out to be 131072, which shows on the devices as 110kb.  


The next thing is to fix the beginning and end sectors of the EBR1, in terminal enter gdisk 2.6gb-EBR1 and press p.

Number  Start (sector)    End (sector)  Size       Code  Name
   1         1443328         2213375   376.0 MiB   8300  Linux filesystem
   2         2213376         7685887   2.6 GiB     8300  Linux filesystem
   3         3261952      4294967294   2.0 TiB     8300  Linux filesystem


The end sector, 7685887 needs to be increased by one, there are two ways this can be done, I found the easiest being, taking the number, 7685887, adding one and in calculator getting the hex value, as so:


Just like before, the value 754700 is going to be read from right to left starting with 47 and ending with 75 making C631 become 47 75.

00 00 83 00 00 00 00 06 16 00 00 C0 0B 00 00 
00 00 00 83 00 00 00 00 C6 21 00 00 81 53 00 00 
00 00 00 83 00 00 00 00 C6 31 00 FF 39 CE FF 00
00 00 00 00 00 00 00 00 00 00 00 00 00 00 00 55 AA

Back in terminal shell, when typing gdisk 2.6gb-EBR1, you can see that the end sector of partition #2 is one number less then the beginning sector of partition #3.  If you pay close attention though, you will notice that the end sector of partition #3 has reduced, this needs to be corrected in order for a successful flash in SPFLASH tools.  

After taking a look at three different MTK6572 EBR1 files, it was discovered that all three ended with a value of 4294967294, to check for yourself, type gdisk EBR1 and you will see that indeed the value is 4294967294.  To double check, gdisk your original EBR1 and check the end sector of partition #3.

What I found that works is, and if you want to try this on your own, subtracting the number, 4294967294, which is the end sector of partition #3, from the start sector of partition #3, in the original EBR1, making sure that the decimal dropdown is selected, then switch to hexadecimal, just as so:

Number  Start (sector)    End (sector)  Size       Code  Name
   1         1443328         2213375   376.0 MiB   8300  Linux filesystem
   2         2213376         3261951   512.0 MiB   8300  Linux filesystem
   3         3261952      4294967294   2.0 TiB     8300  Linux filesystem


 Now in your original EBR1 file, you can see that is where the hex value for the number, 4294967294 comes from:

00 00 83 00 00 00 00 06 16 00 00 C0 0B 00 00 
00 00 00 83 00 00 00 00 C6 21 00 00 81 53 00 00 
00 00 00 83 00 00 00 00 47 75 00 FF 39 CE FF 00

00 00 00 00 00 00 00 00 00 00 00 00 00 00 55 AA

All that has to be done is to take the same value, 4294967294, subtract that that from new start sector of partiion #3 in the 2.6gb-EBR1:


39 CE will now become B8 8A, in terminal shell, gdisk 2.6gb-EBR1 will now show:

Number  Start (sector)    End (sector)  Size       Code  Name
   1         1443328         2213375   376.0 MiB   8300  Linux filesystem
   2         2213376         7685887   2.6 GiB     8300  Linux filesystem
   3         7685888      4294967294   2.0 TiB     8300  Linux filesystem

This is going to leave a storage of 110kb for internal storage, When I tried formatting in gparted to hide, gparted said could not do anything with a size of -1mb.  After a reboot it disappeared, doesn't even show in my file manager when enabling USB storage.  Some system apps are gong to want to use that 110kb for various things. Google Chrome is one example, when trying to share photos in Chrome browser, if that 110kb internal storage is enabled, it will try to use it as a cache, causing a low memory error.

Tuesday, September 30, 2014

Tutorial: How to repartition and increase app space MTK6582

Yet another MediaTek Android Tablet/Phone Hack

In order to repartition the MTK6582, all you need to do is refer back to the instructions written here, how to repartition MTK6572.  The concept is identical, the only difference is that the MTK6582 has an EBR2, like a few other well known MTK devices.  There are tutorials that you may have followed in a few forums, such as this one on XDA-Developers and a few others. The thing I noticed right away is that t MTK6582 is nothing more than an update of the MTK6572.

In terminal shell when you look at the EBR files, you will see something like, when entering in shell:

disktype EBR1

--- EBR1
Regular file, size 512 bytes
DOS/MBR partition map
Partition 1: 900 MiB (943718400 bytes, 1843200 sectors from 165888)
  Type 0x83 (Linux)
Partition 2: 126 MiB (132120576 bytes, 258048 sectors from 2009088)
  Type 0x83 (Linux)
Partition 3: 2.035 GiB (2185232384 bytes, 4268032 sectors from 2267136)
  Type 0x83 (Linux)
Partition 4: 2.000 TiB (2199023255040 bytes, 4294967295 sectors from 144384)
  Type 0x05 (Extended)

disktype EBR2 
--- EBR2
Regular file, size 512 bytes
DOS/MBR partition map
Partition 1: 1.997 TiB (2195677249024 bytes, 4288432127 sectors from 6390784)

  Type 0x83 (Linux)

EBR2 is an extension of your internal storage's partition, so if you want to use all of your internal storage for app storage, all you need to do is change, in the scatter.txt, the section "is_download: for EBR2 from true to false, just like this:

- partition_index: SYS14
  partition_name: EBR2
  file_name: EBR2
  is_download: false
  type: NORMAL_ROM
  linear_start_addr: 0x5300000
  physical_start_addr: 0x4700000
  partition_size: 0x80000
  region: EMMC_USER
  storage: HW_STORAGE_EMMC
  boundary_check: true
  is_reserved: false
  operation_type: UPDATE
  reserve: 0x00 

NOTE: If you do not want to use the entire storage, am not sure what would happen if you used the same mod with the EBR2 removed.

To update the scatter.txt codes, just follow these same directions for the MTK6572 so that your partition sizes match the partitions for the USERDATA and FAT.

Sunday, September 21, 2014

Tutorial #2: Increase MTK6572 Data/Application Storage- Editing MTK6572 Scatter.txt

Part Two - Editing Scatter File and Increasing Phone/Tablet Speed


In the first tutorial you learned how to partition your EBR1 to increase your application data storage, in this section I will explain how to edit your MTK6572_Scatter.txt.  If the EBR1 is repartitioned and loaded to the phone/tablet, the mod will work, with a few bugs.  First off, certain application notifications will not work properly, secondly, the speed of the phone/tablet will decrease considerably.  After editing the scatter file, you will notice, even before the repartition, a significant increase in the performance and speed of the phone/tablet.


NOTE:  After taking a look at different partition schemes on different MTK6572 phone/tablet, found that the partitioning is not exact, after partitioning you have values hanging around, as stated in the last tutorial, you can either leave a decent amount of internal storage or format the remaining amount as ext4 so that the phone/tablet does not show it in a file manager or settings.

Here is a section of my own scatter file, notice the highlighted parts, these two numbers are what we need to modify.


partition_index: SYS17
partition_name: USRDATA
file_name: nvram.bin
is_download: true
type: NONE
linear_start_addr: 0x43F40000
physical_start_addr: 0x43940000
partition_size:0x20000000
region: EMMC_USER
storage: HW_STORAGE_EMMC
boundary_check: true
is_reserved: false
operation_type: UPDATE
reserve: 0x00


partition_index: SYS18
partition_name: FAT
file_name: NONE
is_download: false
type: NONE
linear_start_addr: 0x63F40000
physical_start_addr: 0x63940000
partition_size: 0x87040000
region: EMMC_USER
storage: HW_STORAGE_EMMC
boundary_check: true
is_reserved: false
operation_type: INVISIBLE
reserve: 0x00

To get the decimal value for the usrdata/application partition, 0x20000000, it has to be converted to the decimal value, here is a website that will do the conversion if you do not have the appropriate calculator handy:

The decimal value is 536870912.

There are two ways to check and see if the value is correct, the first way is by checking in a terminal shell under Linux.

sudo disktype EBR1

--- EBR1
Regular file, size 1 KiB (1024 bytes)
DOS/MBR partition map
Partition 1: 376 MiB (394264576 bytes, 770048 sectors from 1443328)
  Type 0x83 (Linux)
Partition 2: 512 MiB (536870912 bytes, 1048576 sectors from 2213376)
  Type 0x83 (Linux)
Partition 3: 1.998 TiB (2197353135616 bytes, 4291705343 sectors from 3261952)
  Type 0x83 (Linux)


The value of Partition 2, 536870912 is the size of USRDATA, now lets do the same thing with the partition size for the FAT, 0x87040000, here is the link for the online hexadecimal to decimal calculator again, the decimal value is 2265186304.  The second way to check both the two values for USRDATA and FAT partitions can also be done is SPFLASH Tools.

USRDATA & FAT PARTITIONS


Now lets add those two values together, you can do it in a Google search engine, here is one provided for you:

 
536870912+2265186304


Google Search


The two partitions added together lets you see that the total of your FAT and USRDATA is 2802057216, but, before taking that value and converting it to a hexadecimal value, we need to subtract that little floating value that was left over from the partitioning.  Lets go back into the terminal shell and take a look now at the new EBR1 file that was created in PART ONE:


sudo disktype 2.5gb-EBR1

--- 2.5gb-EBR1
Regular file, size 1 KiB (1024 bytes)
DOS/MBR partition map
Partition 1: 376 MiB (394264576 bytes, 770048 sectors from 1443328)
  Type 0x83 (Linux)
Partition 2: 2.594 GiB (2785017856 bytes, 5439488 sectors from 2213376)
  Type 0x83 (Linux)

Partition 3: 1.993 TiB (2191011479040 bytes, 4279319295 sectors from 7652864)
  Type 0x83 (Linux)

The newly repartitioned EBR1 file's partition 2 is
2785017856, this now has to be converted to a hexadecimal value, than changed in the scatter.txt.   Here is the same website with the decimal to hexadecimal conversion option, the partition size's hexadecimal value, 0x87040000, is now going to be replaced with 0x10999999.


Now for the FAT we need to find the floating value so that the partition size can be decreased.  Although the phone/tablet is showing a one size as pictured, the actual size can correctly be shown by turning on USB storage and looking at it on the PC file manager.  Since android does not read partitions the same as Linux or windows, we need to find the actual sizes to be able to configure the scatter text correctly.


In this case, my tablet's real value is 17mb, I needed to find the hex value of that number and change it in the FAT partition of the scatter text.  There is no way of finding that actual value when looking in MTK Droid Tools, SPFLASH tools or using the disktype command in a terminal shellWhat actually has to be done is you have to take the new partition size and subtract it from the old partition size.

So now we know that, taking the USRDATA and FAT partitions and adding them together gave us 2802057216, now we need to subtract the new partition size from that, which you saw when typing sudo disktype 2.5gb-EBR1Now in the below  search engine you can subtract those two values:

2802057216-2785017856


Google Search


The new value now is 1703936 (17.03936mb), which has to now be converted to a hex value and replaced with the old FAT partition value.  Here is the link again for that nifty online decimal to hexadecimal calculator and there is the new value for the FAT partition, 0x10400000.  Just a note, I had added one 0 to the end since the scatter file shows eight digits after the 0x for all hexadecimal values.

When you load edited scatter file, make sure to backup the original, SPFlash tools may import all the partitions, there is no need to worry, just make sure to load the appropriate sections when flashing.  If you downloaded a nandroid backup, I found it easier to flash everything except for my system, usrdata and cache.  Those were reflashed in recovery using the custom clockwork mod that was created in MTK Droid Tools.

After repartitioning and reflashing, MTK Droid tools still reads the old partition schemes.  Not really sure where it finds the values yet, working on finding that, possibly hardcoded somewhere in the tablets file system, and fixing it to read correctly, if possible. 

The company where I purchased the tablet from had the actual kernel hidden on their download section with another EBR1 that worked when flashed.  It increased my usrdata from 512mb to 1.27mb.  What was really odd though is that when trying to repartition that EBR1, which nearly used every bit of the FAT partition up, except for about 3-4mb.  The repartitioned 1.27gb EBR1 to 2.6gb would not load, just left the tablet frozen in the boot logo.  So far have looked at three different MTK6572 partition schemes and cannot figure out how they makeup the values, there has to be some easy EBR tweaker that is used.  Unless a bunch of underpaid, overworked nine year old laborors are actually sitting there  manually repartitioning Android Tablet MBR/EBR.

Saturday, September 13, 2014

How to unbrick and unlock the ZTE Mert straighttalk/tracfone z990g to AT&T z990


*** WARNING I WILL NOT BE RESPONSIBLE IF YOU BRICK YOU PHONE PERMANENTLY - PROCEED AT YOUR OWN RISK ***


How to get FTM mode on the ZTE Straighttalk/Tracfone wireless android phone.

StraightTalk/Tracfone FTM mode
Unlocking the ZTE Z990g to ZTE z990 is very easy, to make it even easier, have compiled and provided the files needed to unlock your phone for AT&T, click here to download the files.  Unzip and place the image folder on your sdcard just the way it is:

image
- image.bin


After bricking my own phone, this was because I had flashed the wrong recovery before erasing the boot.  This caused the phone to get stuck in the boot logo and was only able to pickup DFU mode.  Straight Talk probably didn't want to lose customers by making it easy to unlock the bootloader and had ZTE lock it up.  Now there is no support anywhere on the net for this phone, unless you are still a Straight Talk customer paying for the protection plan.  That probably doesn't cover self maintenance much, just a trade in for something of equal value.  Finding this hack is very helpful, in so many ways, once you unlock to AT&T, there is now a working bootloader, download mode and FTM mode.


After performing the ZTE update on-line tool, the phone sometimes goes into download mode.  Pressing the power button will not always wake it back up.  All that needs to be done is, take off the back cover, there is a reset switch to the right of the camera.  Take a toothpick or something that will not damage your phone and press it inside the hole, it should boot right up.  If this does not work, take the battery out replace it and hold the reset switch while plugging the phone into the PC then release.

  1. First download Step One RAR file extract the image folder to your sdcard wit the image.bin inside the image folder, on the root of the SDCARD.  Power down the phone then press home then volume-up then power, do not press at the same time but in that order.  You will see the t flash update, if it takes awhile, that means it is working, if the update completes to soon, this means it did not work.  A successful update will go from 1% to 100% twice.  
  2. Once that has successfully finished, your phone will power up, give it a few minutes to register.  If you want to make sure it really worked, power down, then press volume down then power.  The FTM screen should appear like the picture above.
  3. Next download the Step Two RAR file and do the same, extract the image folder, just the way it is, the image folder with the image.bin, on the root of the sdcard.
  4. Last setp, to complete the task, download this T-Flash update this will convert the ZTE Merit Z990G to a full functional ZTE Avail  Z990.
  5. Now to update to the latest firmware, is also needed if you want to completely Sim unlock the Merit/Avail, download the ZTE online update tool here and follow the instructions to update your firmware to version P736TV1.0.0B32. 
Not sure if after performing the above method actually unlocks your ZTE Z990g to work with an AT&T sim card, did not try a card before performing the below method myself.  You can always insert an AT&T sim card to see if it works, if you prefer using AT&T, the below method is really not necessary.  The above method will convert your phone from Z990G to Z990, this I do know.

    Sim unlocking the Merit/Avail to any carrier


First download QPST Tools, here is version 2.7.411, power down the phone, press volume down then power or volume down and connect to USB port, hold until you see FTM.  Now open the software download tool, select the backup tab and backup your NVRAM.  Once that is done you can download the unlock tool.  Just finished successfully unlocking my converted Z990 from Z990g to work with any network.  Here is this Unlock Tool, extract it and run the unlock tool while in FTM mode, enjoy your new unlocked ZTE Merit Z990G.  You will need to now go back into QPST Tools Software Download, click on the restore tab and restore your NVRAM, this is because the unlock tool will delete some info and the WIFI will not connect.

Monday, September 1, 2014

Tutorial: How to increase partition on MediaTek Tablets MTK6572, MTK6577 and others


Phone Storage
2.5gb App Storage


Modding these tablets, turns out, is much easier then modding the models that have a MBR, EBR1 and EBR2. The models with just one EBR1 instead of two and three is actually very simple, for a simple cheap tablet.  Now there is a way to take that $60 tablet and turn it into a $250 tablet.

This particular mod is so easy, it took me more than a month to figure it out.  After trying all different Apps offered through Google Play Store and others located on XDA developers, nothing seemed to really work, especially for the MTK6572.  After reading several articles about modding other MTK tablets, the last being about partitioning, something clicked.

Originally what had gotten the ball rolling was an MBR and EBR1 fie that I had come across on my manufactures website.  Their MBR was identical with my tablets MBR, the EBR1 were different.  Next, upon flashing the new MBR and EBR1 via SPFlash Tools, it had expanded my internal app storage storage from 512mb to 1.27gb, causing a decrease of my tablet storage from 2.11gb to 1.34gb.  According to this read on XDA, the new discovered MBR/EBR1 was not technically possible, it should not have worked, but it did.  From that tutorial, you need to edit your MBR along with your EBR1, in this tutorial, there is no need to play with the MBR, you just need to concentrate on the EBR1.

Next, tried all different math solutions, comparing the original EBR1 with the new EBR1.  After reading about using partitioning tools, decided to see what would happen if I were to run some command line based partition tools in linux.  That is when I discovered just how the partitions on the MTK6572 tablet works.

****WARNING I WILL NOT BE RESPONSIBLE IF YOU PERMANENTLY BRICK YOUR TABLET/PHONE***

After not having much luck using windows or Cygwin, it became apparent that using, what I could, in linux for a linux based tablet would probably go a long way.

Ubuntu Linux programs you will need are:

  • You can root your tablet either using Framaroot or,
  • MTKdroid tools from here and, it may or may not allow you to root, if not, then get Framaroot and try, read the tutorial on how to backup your tablet before beginning this mod, MTKdroid tools is what you will need to pull your MBR and EBR1, yes you will need windows, sucks.
  • Optional, also, very helpful, a good nandroid backup from the play store, a favorite of mine is nandroid backup this will not pull your EBR1 but is a lifesaver in case of a brick.
  • A Hex editor, some are, wxhexeditor, bless hex editor, jeex or Okteta, I'm using Okteta because it highlights the partitioned numbers making it easy to view.
  •  Google search is a great tool for doing your math solutions, just punch in your numbers in the search bar. 
  • A partition program to examine your mathematical solutions after you changed your EBR1, gdisk works fine, running the command disktype EBR1 and disktype MBR will give you a good understanding of what type of partitions you are working with.  Note, DO NOT bother trying to repartition your EBR1 using a partition tool, it will not work. The partitioning program is going to want to modify your partitions to a recognizable partition, nand partitions are not the same and are not listed in these programs.


Lets inspect our MBR and EBR1, it's good to get familiar at what is being worked on.  Now that you have pulled the MBR and EBR1 using MTKDroid Tools, open up a terminal shell, navigate to where the MBR and EBR1 files are and enter:

disktype MBR

The output will be something like, here is mine:

--- MBR
Regular file, size 512 bytes
DOS/MBR partition map
Partition 1: 2.000 TiB (2199023255040 bytes, 4294967295 sectors from 1024)
  Type 0x05 (Extended)
Partition 2: 10 MiB (10485760 bytes, 20480 sectors from 18432)
  Type 0x83 (Linux)
Partition 3: 10 MiB (10485760 bytes, 20480 sectors from 38912)
  Type 0x83 (Linux)
Partition 4: 650 MiB (681574400 bytes, 1331200 sectors from 113152)
  Type 0x83 (Linux)

Now lets take a look at your EBR1:
disktype EBR1

--- EBR1
Regular file, size 1 KiB (1024 bytes)
DOS/MBR partition map
Partition 1: 376 MiB (394264576 bytes, 770048 sectors from 1443328)
  Type 0x83 (Linux)
Partition 2: 512 MiB (536870912 bytes, 1048576 sectors from 2213376)
  Type 0x83 (Linux)

Partition 3: 1.998 TiB (2197353135616 bytes, 4291705343 sectors from 3261952)
  Type 0x83 (Linux)

This gives you an idea of how far you can expand your storage, looking at the 2TIB makes you wonder, why would they create an MBR/EBR with a 2TIB capability but my internal storage is 4gb total and the tablet only supports up to 32gb?  Well, I'm thinking that this is a versatile used partition scheme used on many different devices, it could also be a potential to increase your internal app storage way beyond 4gb + 32gb with other mods down the road.  What we want to focus on at the moment is, how much can partition #2 be increased to install more apps.

Now lets get a look at what the partitions look like, again in terminal type:

gdisk MBR
Press p to print the MBR information

The output will look something like this:


Disk MBR: 1024 sectors, 512.0 KiB
Logical sector size: 512 bytes
Disk identifier (GUID): 8092B769-A758-413F-AB79-CCDB0BC73A2F
Partition table holds up to 128 entries
First usable sector is 34, last usable sector is 990
Partitions will be aligned on 512-sector boundaries
Total free space is 957 sectors (478.5 KiB)

Number  Start (sector)    End (sector)  Size       Code  Name
   2           18432           38911   10.0 MiB    8300  Linux filesystem
   3           38912           59391   10.0 MiB    8300  Linux filesystem
   4          113152         1444351   650.0 MiB   8300  Linux filesystem

Now enter q to exit

Now lets do the same with the EBR1

gdisk EBR1

 Hit p again:


Command (? for help): p
Disk EBR1: 2 sectors, 1024 bytes
Logical sector size: 512 bytes
Disk identifier (GUID): C631D7B1-0586-4F22-A806-1B155BE2BBE7
Partition table holds up to 128 entries
First usable sector is 34, last usable sector is 18446744073709551584
Partitions will be aligned on 512-sector boundaries
Total free space is 18446744069416027584 sectors (8.0 ZiB)

Number  Start (sector)    End (sector)  Size       Code  Name
   1         1443328         2213375   376.0 MiB   8300  Linux filesystem
   2         2213376         3261951   512.0 MiB   8300  Linux filesystem
   3         3261952      4294967294   2.0 TiB     8300  Linux filesystem
Now press q to exit

What we want to concentrate on is resizing the second partition.  For this mod to work, if you look closely, partition three starts one digit higher from where partition two ends.  These are the two numbers that we need to increase but make sure that the end of partition two is one digit lower then the beginning of partition three, else, big ole fat BRICK!

Now open the EBR1 using a hex editing program, here is what you need to concentrate on:

0000:01C0 | 00 00 83 00  00 00 00 06  16 00 00 C0  0B 00 00 00 | ...........À....
0000:01D0 | 00 00 83 00  00 00 00 C6  21 00 00 00  10 00 00 00 | .......Æ!.......
0000:01E0 | 00 00 83 00  00 00 00 C6  31 00 FF 39  CE FF 00 00 | .......Æ1.ÿ9Îÿ..
0000:01F0 | 00 00 00 00  00 00 00 00  00 00 00 00  00 00 55 AA | ..............Uª

These are the three values that are going to be increased:

00 10 will be 0x0010
C6 31 will be 0xC631
39 CE will be 0x39CE

For every 512mb we are going to add 10 to all three of those values separately, so if you want to increase your partition to 1.5gb, you will need to add 30 to each section.  Lets do this in a Google search, enter your number 0x####+30, you can use the one provided below, mine would be 0x0010+30, yours may be different.

Here my value is 0x2E which the same as 0x002E, so now in the hex editor my 00 10 will become 00 2E, the 00 is going to be the same and the 10 is going to become 2E

The next set of number, C6 31 is going to become 0xC631, again in the search enter 0x####+30 (0xC631+30)


My new value has gone from C6 31 to C6 4F, the C6 has actually stayed the same just like before.

Now for the last two numbers, we are going to do the exact same thing, enter your formula below, ie. 39 CE will be entered as 0x39CE+30
Mine has now went from 39 CE to 39 EC.

Now save your editing under a different name, always keep your original, you can name it what ever you want, I will explain how you can select your new EBR1 without having to make any changes to your scatter.txt in SPFlash Tools, lets save it as 1.5gb-EBR1.

Now we are going to check the values in  gdisk, open up terminal shell again and type:

gdisk 1.5gb-EBR1

 Disk 1.5gb-EBR1: 2 sectors, 1024 bytes
Logical sector size: 512 bytes
Disk identifier (GUID): 42E75C31-9EF0-47FB-9C59-97DA9BE821CA
Partition table holds up to 128 entries
First usable sector is 34, last usable sector is 18446744073709551584
Partitions will be aligned on 512-sector boundaries
Total free space is 18446744069412095424 sectors (8.0 ZiB)

Number  Start (sector)    End (sector)  Size       Code  Name
   1         1443328         2213375   376.0 MiB   8300  Linux filesystem
   2         2213376         5228031   1.4 GiB     8300  Linux filesystem
   3         5228032      4298899454   2.0 TiB     8300  Linux filesystem

You will now have new values:

The new values are now higher, make sure, as mentioned earlier, that partition two's End Sector is one digit less then  partition three's start sector.  Also make sure that no other values have changed from your original EBR1.

Now the fun part, restarting and logging back into windows so that you can access SPFlash tools, yes I know it really sucks!

Fire up SPflash tools, make sure you have selected the correct scatter.txt.  When flashing your new EBR1 you are going to need to reflash everything, the new EBR1 is going to erase everything on your phone, which is why a backup and a second backup is very important.

In SPFlash you will see to your right, the location of your original EBR1, click that box on the right as shown below:


A window is now going to open, select your new 1.5gb-EBR1 and flash away!

**NOTE**  At the time, am working on a mod that will allow you to extend your storage that will extend to your SDCARD.  Have not tried the theory yet, but think that if you extend your EBR1 beyond the total space of your phone storage, for example, if you have 2.5gb of extra phone storage and want to add another 2gb, think it may work using the int2ext mod as shown on some forums.

Downside to this mod, you will not be able to remove or if anything ever happens to your SDCard or your tablet may not boot up, will probably get stuck at the first logo.  Another issue is that, this could potentially eat up your SDCard.

Another problem is that, in order for this mod to work, you will need to edit your vold.fstab and save it back to your tablet.  Some tablets have the option to adb to your phone once it gets to the boot logo.  If this is the case, after flashing the EBR1 you can plug the tablet into the USB port and adb pull /etc/vold.fstab, edit and adb push back.

If you are unable to adb shell at the boot logo, the only other option is to edit your system.img, save the vold.fstab and flash back along with your new EBR1.  An easier way, after reflashing via SPFlash tools to recover the brick, as long as one did download, from the play store, a nandroid backup.  The backup saves your system as a system.tar.  Open the system.tar file, locate the vold.fstab in /etc/ edit it with an editor, repack to the tar.  You could then flash the new EBR1, with all other backups in SPFlash tools, boot into recovery, then restore your tablet to the last settings using the nandroid backup.

As for the SDcard part to work, it may have to be formatted as fat32 or unallocated, this way the EBR1 will write the needed numbers to the area, bad news, you would have to figure out how to:

  1. partition the sdcard off and get your vold.fstab to recognize the amount of leftover storage you want it to read as phone storage.  The tablet may not recognize the remaining SDCARD storage as phone storage if formatted as unallocated.  Also, the EBR1 may not be able to extend to storage that is already formatted as fat32, it works for the phone storage, just not sure about the SDCARD theory.
  2. use the entire SDcard as extended app storage, then buy yourself one of those USB memory sticks, it can be plugged into the tablet's USB port and the other end into your PC's USB Port.  Not sure how most of these tablets work with the USB stick method, probably is another vold.fstab issue.

Adsense

My Blog List